Navigation
In order to start setting up your connections, you must enable the uTorrent Web UI functionality for each uTorrent server you would like to control remotely using the Torrent Remote app. You can follow the steps below to learn how to do this.
Enabling the Web UI
- On the computer running the uTorrent desktop program, open its main window
- From the menu bar at the top, click Options and then click Preferences from the drop down menu (See Figure 1).
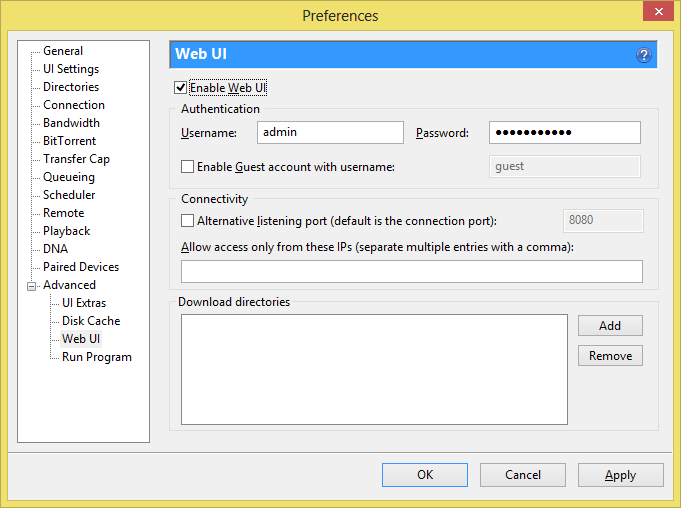
- In the Preferences window, on the left expand Advanced and then click Web UI.
- On the right, place a check in the box labeled Enable Web UI to enable the Web UI functionality.
- Click OK to to save your changes.

Figure 1. The uTorrent preferences window.
Configuring the Web UI
- On the computer running the uTorrent desktop program, open its main window.
- From the menu bar at the top, click Options and then click Preferences from the drop down menu.
- In the Preferences window, on the left expand Advanced and then click Web UI.
- Under Authentication, enter a user name and password. You will need these later when connecting with the Torrent Remote app.
- Advanced Users: If you would like to choose a different port for the Web UI, check the box Alternative listening port and supply a port number in the text box.
- Click OK to to save your changes.
Warning
Due to a limitation with the storage of user names and passwords in the Windows Runtime, empty passwords are not supported. You must specify a password in Step 4 above. This also means that the guest functionality of the uTorrent Web UI cannot be used either with the Torrent Remote app.
Note
The uTorrent program must remain open on your computer for connections to it from the Torrent Remote app to work. It is okay for it to remain minimized to the notification area (also known incorrectly as the system tray).
Next step
After enabling and configuring the Web UI, the next step is to ensure the computer running the uTorrent desktop program can be accessed on the local network. See Setting up for access on a local network.